> ## Documentation Index
> Fetch the complete documentation index at: https://docs.aihive.global/llms.txt
> Use this file to discover all available pages before exploring further.
# WorkFlow
> WorkFlow - AI Hive Documentation
# Workflow Guide (Automation Process)
**Workflow** is a powerful feature that helps you automate complex tasks consisting of multiple sequential steps (e.g., Write SEO article -> Translate to English -> Post to Facebook).
Unlike Chat Flow (interactive with users), Workflow runs straight through from start to finish to produce results.
## Workflow Design Thinking
A standard Workflow always consists of 3 main components:
1. **Start (Input):** Where you enter data (e.g., Keywords, Topics).
2. **Nodes (Processing Steps):** "AI workers" performing individual tasks (Write, Translate, Summarize...).
3. **End (Output):** The final result you receive.
> 💡 Golden Rule: The result of the previous step is the input material for the next step. Use variables \{\{...}} to transfer data between steps.
***
## Practice: Create "SEO Article Writing" Workflow
In this tutorial, we'll build an automated process with 3 steps:
* **Step 1:** Create an article outline from keywords.
* **Step 2:** Write detailed content based on the outline.
* **Step 3:** Create an attractive headline.
### Step 1: Initialize Workflow
1. On the **Studio** screen, click the **Create New (+)** button.
2. Select application type: **Workflow**.
3. Name it: *"SEO Article Writing Process"*.
4. Enter description (optional) and click **Create**.
 ### Step 2: Configure Input (Start Node)
We need to declare what the user will input.
1. Click on the **Start** node.
2. In the configuration panel, click **+ Add Variable**.
3. Fill in variable information:
* **Variable Name:** `topic` (no spaces or special characters).
* **Label:** `Article Topic`.
* **Type:** Text.
* **Required:** Yes.
### Step 2: Configure Input (Start Node)
We need to declare what the user will input.
1. Click on the **Start** node.
2. In the configuration panel, click **+ Add Variable**.
3. Fill in variable information:
* **Variable Name:** `topic` (no spaces or special characters).
* **Label:** `Article Topic`.
* **Type:** Text.
* **Required:** Yes.
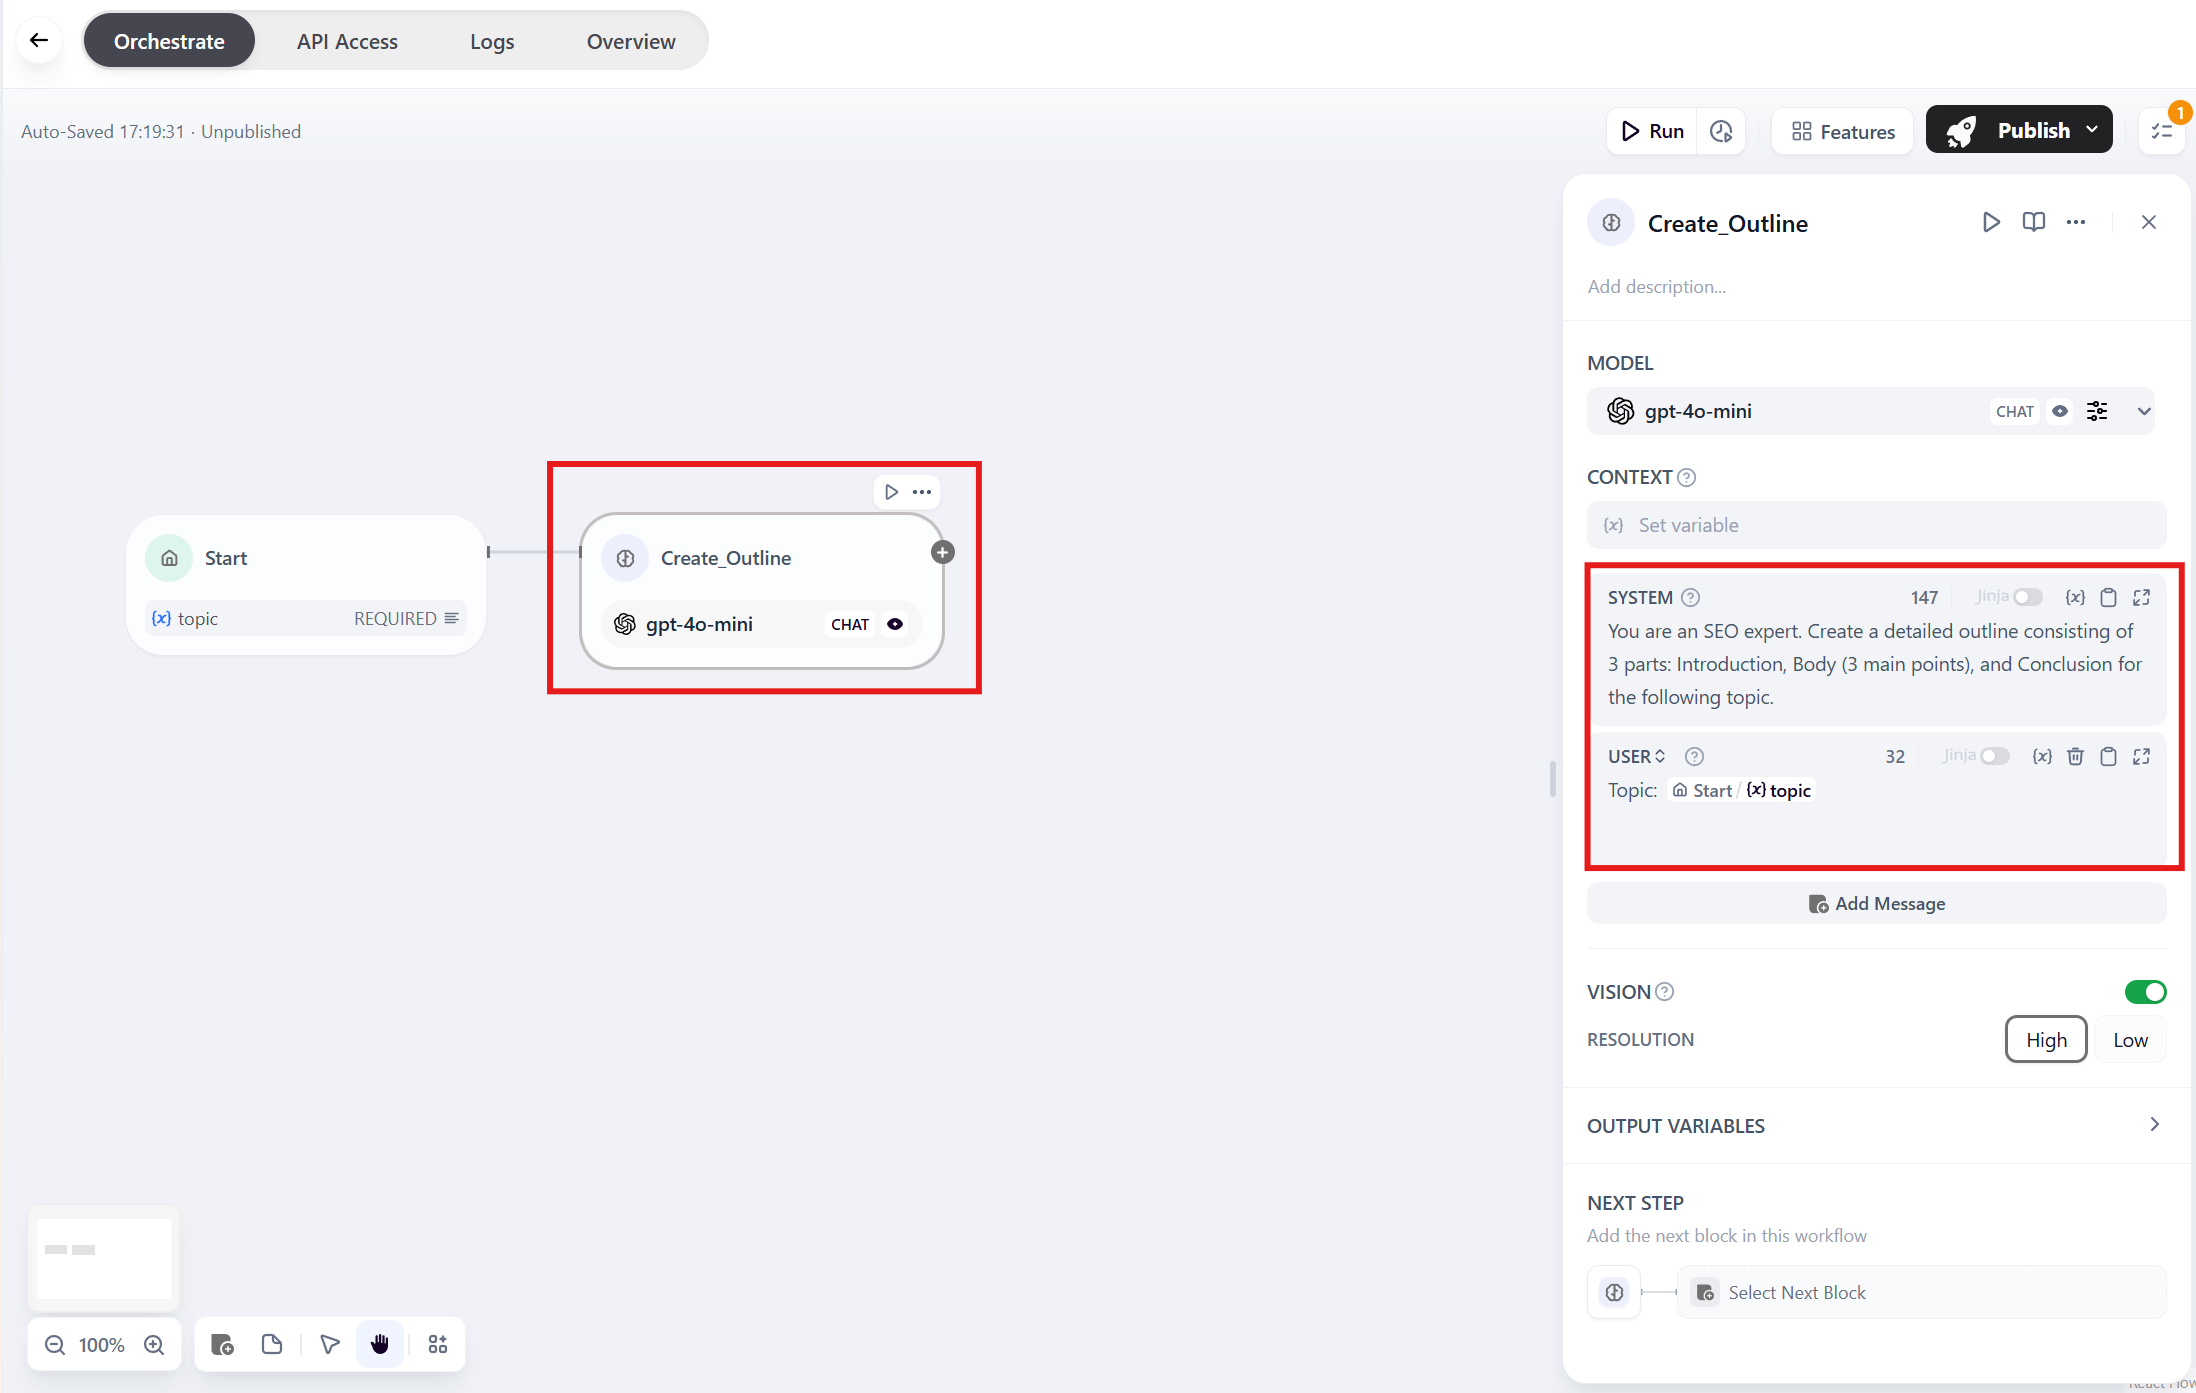
 ### Step 3: Create "Create Outline" Step (LLM Node 1)
1. Click the **(+)** after the Start node -> Select **LLM**.
2. Rename the node: `Create_Outline`.
3. **Configure SYSTEM PROMPT:**
> "You are an SEO expert. Create a detailed outline consisting of 3 parts: Introduction, Body (3 main points), and Conclusion for the following topic."
4. **Configure USER PROMPT:**
* Click `Add message`
* In the `User` field, enter: `Topic:`
* Press `/` key -> Select `topic` from the `Start` node
* *Display:* `Topic: \{\{Start/(x)topic\}\}`
### Step 3: Create "Create Outline" Step (LLM Node 1)
1. Click the **(+)** after the Start node -> Select **LLM**.
2. Rename the node: `Create_Outline`.
3. **Configure SYSTEM PROMPT:**
> "You are an SEO expert. Create a detailed outline consisting of 3 parts: Introduction, Body (3 main points), and Conclusion for the following topic."
4. **Configure USER PROMPT:**
* Click `Add message`
* In the `User` field, enter: `Topic:`
* Press `/` key -> Select `topic` from the `Start` node
* *Display:* `Topic: \{\{Start/(x)topic\}\}`
 ### Step 4: Create "Write Article" Step (LLM Node 2)
1. Click the **(+)** after `Create_Outline` node -> Select **LLM**.
2. Rename the node: `Write_Article`.
3. **Configure SYSTEM PROMPT:**
> "You are a professional Copywriter. Based on the provided outline, write a complete blog post with engaging style, approximately 500 words."
4. **Configure USER PROMPT:**
* Enter: `Write an article based on the following outline:`
* Press `/` key -> Select **Create\_Outline** -> Select `text`.
* *Note:* Select the `text` variable from the outline node, NOT the `topic` variable from the Start node.
### Step 4: Create "Write Article" Step (LLM Node 2)
1. Click the **(+)** after `Create_Outline` node -> Select **LLM**.
2. Rename the node: `Write_Article`.
3. **Configure SYSTEM PROMPT:**
> "You are a professional Copywriter. Based on the provided outline, write a complete blog post with engaging style, approximately 500 words."
4. **Configure USER PROMPT:**
* Enter: `Write an article based on the following outline:`
* Press `/` key -> Select **Create\_Outline** -> Select `text`.
* *Note:* Select the `text` variable from the outline node, NOT the `topic` variable from the Start node.
 ### Step 5: Configure Output (End Node)
Finally, we need to output the article to the screen.
1. Drag a line from `Write_Article` node to connect to the **End** node.
2. Click on the **End** node.
3. In **Output Variables**, click **+ Add Variable**.
4. Select source variable:
* Click the value field -> Select **Write\_Article** -> Select `text`.
* Name the output variable: `final_article`.
### Step 5: Configure Output (End Node)
Finally, we need to output the article to the screen.
1. Drag a line from `Write_Article` node to connect to the **End** node.
2. Click on the **End** node.
3. In **Output Variables**, click **+ Add Variable**.
4. Select source variable:
* Click the value field -> Select **Write\_Article** -> Select `text`.
* Name the output variable: `final_article`.
 ***
## Testing
Before actual use, test to see if the process runs smoothly.
1. Click the **Run** button in the top right corner.
2. An input field appears, requesting the **Article Topic**.
3. Enter test: *"Benefits of drinking orange juice"*.
4. Click **Run** and observe the nodes lighting up sequentially.
5. The final result will display the complete article in the right panel.
6. Once the output is satisfactory, click `Publish`.
***
## Testing
Before actual use, test to see if the process runs smoothly.
1. Click the **Run** button in the top right corner.
2. An input field appears, requesting the **Article Topic**.
3. Enter test: *"Benefits of drinking orange juice"*.
4. Click **Run** and observe the nodes lighting up sequentially.
5. The final result will display the complete article in the right panel.
6. Once the output is satisfactory, click `Publish`.
 ***
## Pro Tips
* **Add review step:** You can add a **"Human Review"** node in between for manual review of the outline before the Bot writes the article.
* **Combine tools:** You can add a **Tools** node (Google Search) at the beginning for the Bot to search for the latest information before writing.
* **Multiple output formats:** At the End node, you can output both Outline and Article simultaneously by adding 2 output variables.
***
## Pro Tips
* **Add review step:** You can add a **"Human Review"** node in between for manual review of the outline before the Bot writes the article.
* **Combine tools:** You can add a **Tools** node (Google Search) at the beginning for the Bot to search for the latest information before writing.
* **Multiple output formats:** At the End node, you can output both Outline and Article simultaneously by adding 2 output variables.